The demo of the project is live at: https://firebase-auth-with-nextjs.netlify.app/
Authentication is an important feature of every web application nowadays. In the past, implementing authentication was a bit difficult where developers have had to write codes to cover security and middlewares for the application. Thankfully with the modern tech stacks today, implementing authentication in a web project has become easier than before. In particular, Firebase is a great tool for handling authentication and user management.
Firebase has a lot of benefits when it comes to NoSQL databases, and one of them is authentication that we will cover in this tutorial. Firebase can be integrated with different technologies, but in this article, we focus on Next.js which is another fantastic tool for building modern web applications.
Let's learn together.
1. Create a Next.js project with TypeScript
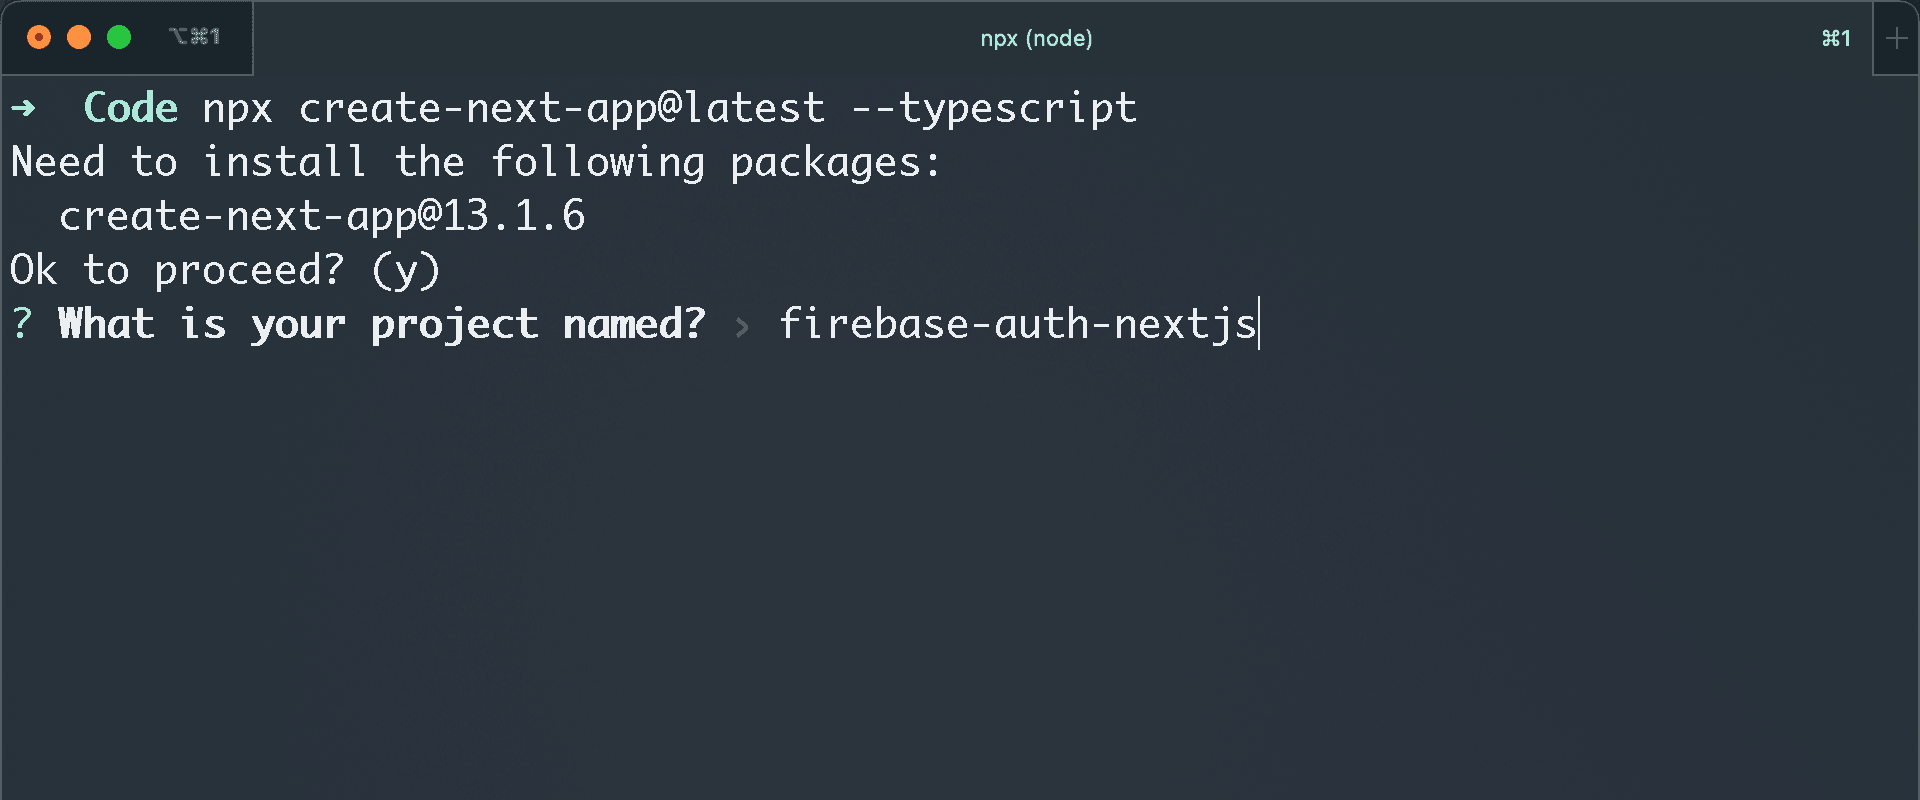
To begin with, we need to create a Next.js project with TypeScript. Copy the command below to your terminal or visit the Next.js Docs to learn more.
npx create-next-app@latest --typescript
Next.js will ask you to give your project a name, if you want to enable eslint, and a few other questions. Once all done, create-next-app will create your Next.js project.
2. Add Tailwind CSS to your project
Tailwind CSS is an awesome framework for styling your projects. We will use it for styling our forms and the layout. Add it to your project using these commands:
npm install -D tailwindcss postcss autoprefixer
Create a Tailwind config file:
npx tailwindcss init -p
Replace the content section in your Tailwind config file with this code:
content: [
    "./app/**/*.{js,ts,jsx,tsx}",
    "./pages/**/*.{js,ts,jsx,tsx}",
    "./components/**/*.{js,ts,jsx,tsx}",

    // Or if using `src` directory:
    "./src/**/*.{js,ts,jsx,tsx}",
],
3. Create a Firebase project
Now, we need to create a Firebase project. Creating a Firebase project is super simple, just follow the below steps.
Visit Google Firebase Console, make sure you sign in with your Gmail account.
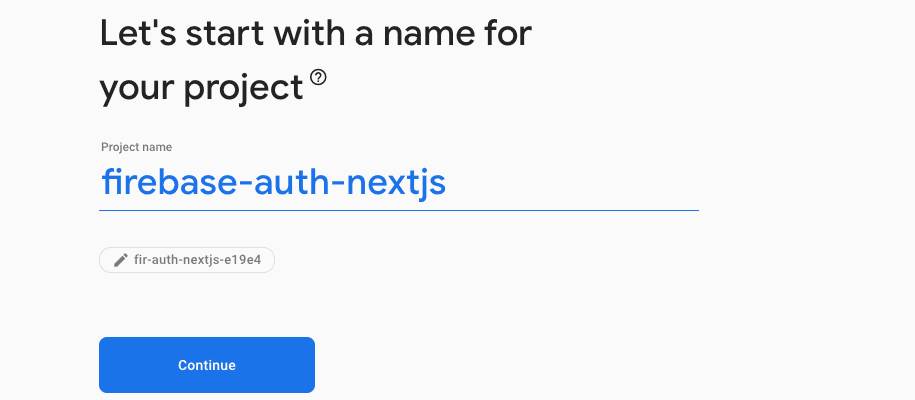
Once you are there, click on the Add project button in your Firebase console to create a new project. Give your project a name, in our case, firebase-auth-nextjs is a good name, and then click continue.
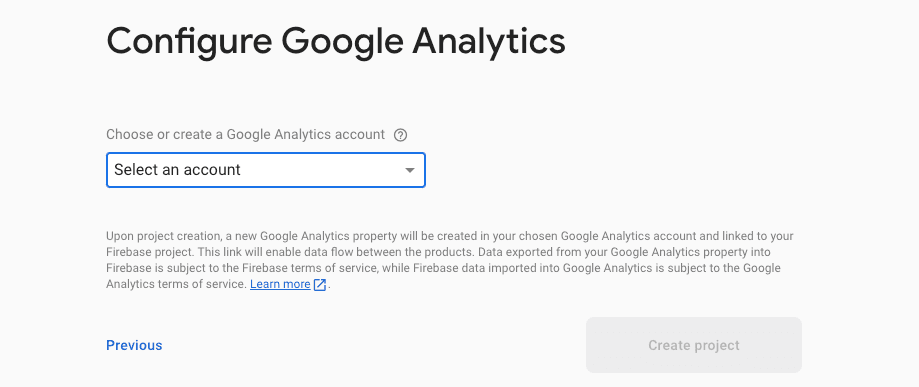
Next, Firebase will ask you if you want to enable analytics for your project. If you wish to enable analytics, make sure to turn it on and then click continue.
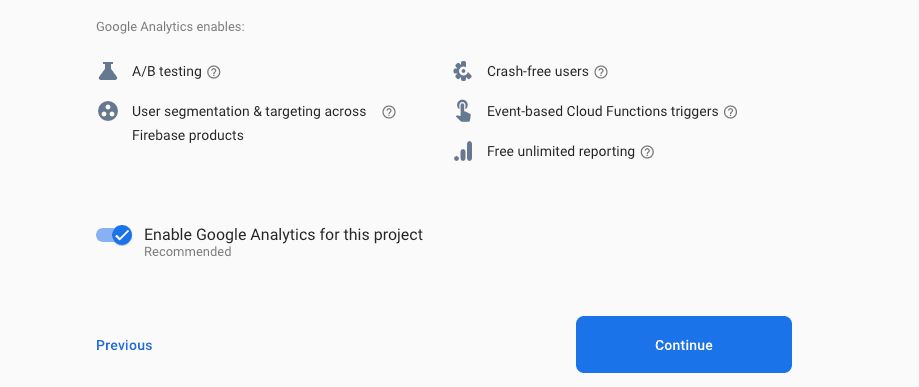
If you enabled Google analytics for your Firebase project, Google will ask you to add an analytics account to your project. If you don't have one, just create a new Google analytics account and connect it to your project. Once everything is done, click Create Project so that Firebase creates your project.
4. Add Firebase to your Next.js project
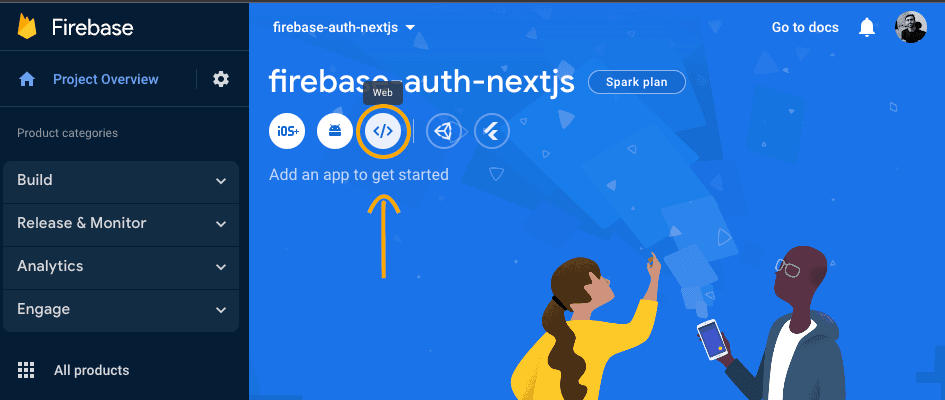
Visit the dashboard of your newly created Firebase project and click on the configure for web icon in your project as circled in this image:
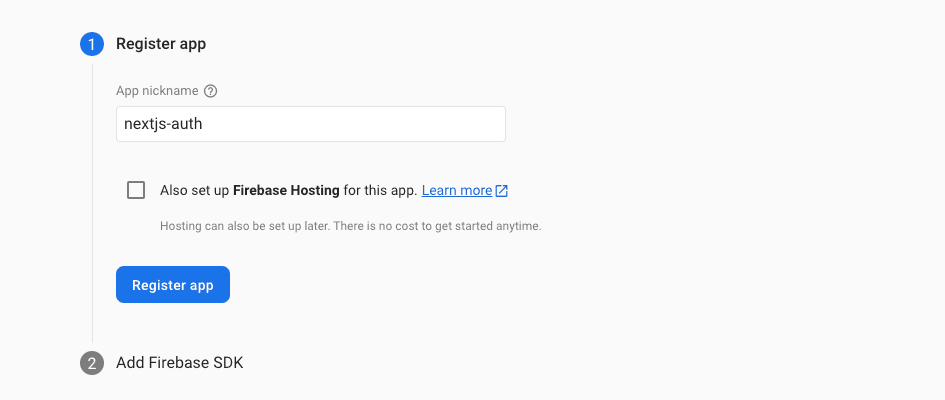
Next, register your app as below. You can give any name to your app.
Next, we need to add Firebase SDK to our project by simply running the following command:
npm install firebase
Firebase will give our project unique configuration details that we will need when we sign up and sign in the user.
Create a config folder in your project root and then create a firebase.config.js file and past the code from your Firebase project.
import { getApps, initializeApp } from 'firebase/app';
import { getAuth } from 'firebase/auth';

// Your web app's Firebase configuration
// For Firebase JS SDK v7.20.0 and later, measurementId is optional
const firebaseConfig = {
    apiKey: process.env.NEXT_PUBLIC_FIREBASE_API_KEY,
    authDomain: process.env.NEXT_PUBLIC_FIREBASE_AUTH_DOMAIN,
    projectId: process.env.NEXT_PUBLIC_FIREBASE_PROJECT_ID,
    storageBucket: process.env.NEXT_PUBLIC_FIREBASE_STORAGE_BUCKET,
    messagingSenderId: process.env.NEXT_PUBLIC_FIREBASE_MESSAGING_SENDER_ID,
    appId: process.env.NEXT_PUBLIC_FIREBASE_APP_ID
};

// Initialize Firebase
if (!getApps().length) {
    initializeApp(firebaseConfig);
}
// Initialize Firebase auth
export const auth = getAuth();
We need to create a .env.local file in our project root and add the Firebase keys and ids and then we read it from our env file. Make sure to include the .env.local file in your .gitignore file so that it's not pushed to Github.
As you can see, we import the getApps to our config file in addition to the initializeApp function. We check for our apps if it's already initialized, if not, we then initialize the app and pass in the firebaseConfig.
At the end of the Firebase authentication file above, we create an auth and export it so that we can simply import it any where we want.
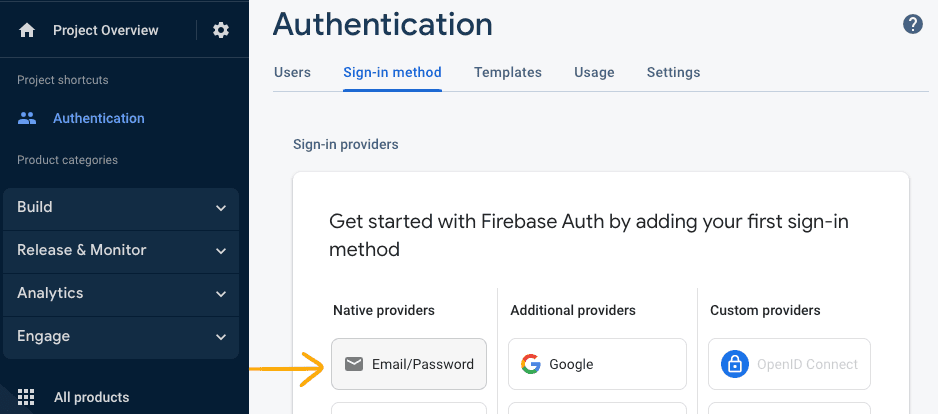
The last step for our Firebase project is to add a sign in provider. Go to your Firebase project dashboard and click on authentication, then click on sign-in-methods and click on Email/Password and then enable the provider.
5. Create pages
Replace your code in the index.tsx page with this code:
import Head from 'next/head';
import LoginForm from '@/components/LoginForm';

export default function Home() {
    return (
        <>
            <Head>
                <title>Login - Firebase Authentication With Next.js</title>
                <meta
                    name="description"
                    content="Learn how to implement Google Firebase Authentication in your React, Next.js, TypeScript projects."
                />
                <meta
                    name="viewport"
                    content="width=device-width, initial-scale=1"
                />
                <link rel="icon" href="/favicon.ico" />
            </Head>
            <main className="from-primary-color m-0 bg-gradient-to-br to-blue-400 px-4">
                <LoginForm />
            </main>
        </>
    );
}
We are just importing the LoginForm component that we will create in a minute.
Then, create the register.tsx file and past the this code:
import RegistrationForm from '@/components/RegistrationForm';
import Head from 'next/head';

const register = () => {
    return (
        <>
            <Head>
                <title>Register - Firebase Authentication With Next.js</title>
                <meta
                    name="description"
                    content="Learn how to implement Google Firebase Authentication in your React, Next.js, TypeScript projects."
                />
                <meta
                    name="viewport"
                    content="width=device-width, initial-scale=1"
                />
                <link rel="icon" href="/favicon.ico" />
            </Head>

            <main className="from-primary-color m-0 min-h-screen bg-gradient-to-br to-blue-400 px-4">
                <RegistrationForm />
            </main>
        </>
    );
};

export default register;
Last but not least, we need to create a dashboard.tsx file where we will redirect the users once they are signed in or signed up.
import ProtectedRoute from '@/components/ProtectedRoute';
import { useAuth } from '@/context/AuthContext';
import Head from 'next/head';
import { useRouter } from 'next/router';

const Dashboard = () => {
    const { user, logOut } = useAuth();
    const router = useRouter();

    return (
        <ProtectedRoute>
            <Head>
                <title>Dashboard - Firebase Authentication With Next.js</title>
                <meta
                    name="description"
                    content="Learn how to implement Google Firebase Authentication in your React, Next.js, TypeScript projects."
                />
                <meta
                    name="viewport"
                    content="width=device-width, initial-scale=1"
                />
                <link rel="icon" href="/favicon.ico" />
            </Head>

            <div className="container mx-auto flex min-h-screen items-center py-2">
                <div className="mx-auto mt-24 overflow-y-hidden px-12 py-24 text-gray-600">
                    <h2 className="mb-4 text-2xl font-semibold">
                        You are logged in!
                    </h2>

                    <div className="mb-8 flex items-center justify-center">
                        <button
                            onClick={() => {
                                logOut();
                                router.push('/');
                            }}
                            className="rounded-md bg-green-600 px-10 py-3 text-white shadow-sm hover:bg-green-700"
                        >
                            Logout
                        </button>
                    </div>
                </div>
            </div>
        </ProtectedRoute>
    );
};

export default Dashboard;
Don't worry about the useAuth context, we are creating that in the next step.
6. Create AuthContext and AuthContextProvider
After we have created our pages, now we need to create the AuthContext where the actual logic of the firebase authentication goes in.
Create a context folder in the root folder of your project and then create an AuthContext.tsx file and then past this code in your AuthContext.tsx file:
import React, { createContext, useContext, useEffect, useState } from 'react';
import {
    createUserWithEmailAndPassword,
    onAuthStateChanged,
    signInWithEmailAndPassword,
    signOut
} from 'firebase/auth';
import { auth } from '../config/firebase.config';

// User data type interface
interface UserType {
    email: string | null;
    uid: string | null;
}

// Create auth context
const AuthContext = createContext({});

// Make auth context available across the app by exporting it
export const useAuth = () => useContext<any>(AuthContext);

// Create the auth context provider
export const AuthContextProvider = ({
    children
}: {
    children: React.ReactNode;
}) => {
    // Define the constants for the user and loading state
    const [user, setUser] = useState<UserType>({ email: null, uid: null });
    const [loading, setLoading] = useState<Boolean>(true);

    // Update the state depending on auth
    useEffect(() => {
        const unsubscribe = onAuthStateChanged(auth, (user) => {
            if (user) {
                setUser({
                    email: user.email,
                    uid: user.uid
                });
            } else {
                setUser({ email: null, uid: null });
            }
        });

        setLoading(false);

        return () => unsubscribe();
    }, []);

    // Sign up the user
    const signUp = (email: string, password: string) => {
        return createUserWithEmailAndPassword(auth, email, password);
    };

    // Login the user
    const logIn = (email: string, password: string) => {
        return signInWithEmailAndPassword(auth, email, password);
    };

    // Logout the user
    const logOut = async () => {
        setUser({ email: null, uid: null });
        return await signOut(auth);
    };

    // Wrap the children with the context provider
    return (
        <AuthContext.Provider value={{ user, signUp, logIn, logOut }}>
            {loading ? null : children}
        </AuthContext.Provider>
    );
};
The AuthContext contains a few functions and useEffect that are explained below:
- First we import all necessary functions from firebase/auth
- Then, we import the auth from firebase.config.js (You remember we have created and exported that in the firebase.config.js)
- Next, we create an interface for the user
- Then, we create the AuthContext and passing it to the useAuth
- After that, we create the AuthContextProvider where we define a few states for the user and a useEffect that updates the state depending on the auth
- Then we create separate functions for signUp, logIn and logout
- At the end, we return the AuthContext.Provider and we pass in all the values
Next we need to wrap our _app.tsx file in the pages folder with the AuthContextProvider:
import { AuthContextProvider } from '@/context/AuthContext';
import '@/styles/globals.css';
import type { AppProps } from 'next/app';

export default function App({ Component, pageProps }: AppProps) {
    return (
        <AuthContextProvider>
            <Component {...pageProps} />
        </AuthContextProvider>
    );
}
7. Create the components
If you don't see the components folder in your project, simply create a components folder at the root of your project.
Create a ProtectedRoute.tsx file and past this code in your ProtectedRoute.tsx file:
import { useAuth } from '@/context/AuthContext';
import { useRouter } from 'next/router';
import React, { useEffect } from 'react';

const ProtectedRoute = ({ children }: { children: React.ReactNode }) => {
    const router = useRouter();
    const { user } = useAuth();

    useEffect(() => {
        if (!user.uid) {
            router.push('/');
        }
    }, [router, user]);

    return <div>{user ? children : null}</div>;
};

export default ProtectedRoute;
The ProtectedRoute helps us protect our routes like the Dashboard from unauthenticated users.
Next, create a LoginForm.tsx file and past the code below in there:
import NextLink from 'next/link';
import { useRouter } from 'next/router';
import { useState } from 'react';
import { FiChevronRight } from 'react-icons/fi';
import { useAuth } from '@/context/AuthContext';
import { LoginType } from '@/types/AuthTypes';

const LoginForm = () => {
    const [data, setData] = useState<LoginType>({
        email: '',
        password: ''
    });

    // Use the signIn method from the AuthContext
    const { logIn } = useAuth();
    const router = useRouter();

    const handleLogin = async (e: any) => {
        e.preventDefault();
        try {
            await logIn(data.email, data.password);
            router.push('/dashboard');
        } catch (error: any) {
            console.log(error.message);
        }
    };

    // Destructure data from the data object
    const { ...allData } = data;

    // Disable submit button until all fields are filled in
    const canSubmit = [...Object.values(allData)].every(Boolean);

    return (
        <div className="flex items-center justify-center">
            <div className="w-full max-w-sm rounded-lg border border-gray-200 bg-white p-4 py-8 shadow-md dark:border-gray-700 dark:bg-gray-800 sm:p-6 sm:py-10 md:p-8 md:py-14">
                <form action="" onSubmit={handleLogin} className="group">
                    <h5 className="mb-2 text-center text-2xl font-medium text-gray-900 dark:text-white sm:text-3xl sm:font-semibold">
                        Login
                    </h5>
                    <p className="text-md mb-8 text-center text-gray-500 dark:text-gray-200">
                        Please enter your login credentials to login to the
                        dashboard.
                    </p>
                    <div className="mb-5">
                        <label
                            htmlFor="email"
                            className="mb-2 block text-sm font-medium text-gray-900 dark:text-white"
                        >
                            Your email
                        </label>
                        <input
                            type="email"
                            name="email"
                            id="email"
                            className="valid:[&:not(:placeholder-shown)]:border-green-500 [&:not(:placeholder-shown):not(:focus):invalid~span]:block invalid:[&:not(:placeholder-shown):not(:focus)]:border-red-400 block w-full rounded-lg border border-gray-300 bg-gray-50 p-2.5 text-sm text-gray-900 placeholder-gray-300 focus:border-blue-500 focus:ring-blue-500 dark:border-gray-500 dark:bg-gray-600 dark:text-white dark:placeholder-gray-400"
                            autoComplete="off"
                            required
                            pattern="[a-z0-9._+-]+@[a-z0-9.-]+\.[a-z]{2,}$"
                            placeholder="name@company.com"
                            onChange={(e: any) => {
                                setData({
                                    ...data,
                                    email: e.target.value
                                });
                            }}
                        />
                        <span className="mt-1 hidden text-sm text-red-400">
                            Please enter a valid email address.{' '}
                        </span>
                    </div>
                    <div className="mb-5">
                        <label
                            htmlFor="password"
                            className="mb-2 block text-sm font-medium text-gray-900 dark:text-white"
                        >
                            Your password
                        </label>
                        <input
                            type="password"
                            name="password"
                            id="password"
                            placeholder="••••••••"
                            className="valid:[&:not(:placeholder-shown)]:border-green-500 [&:not(:placeholder-shown):not(:focus):invalid~span]:block invalid:[&:not(:placeholder-shown):not(:focus)]:border-red-400 block w-full rounded-lg border border-gray-300 bg-gray-50 p-2.5 text-sm text-gray-900 placeholder-gray-300 focus:border-blue-500 focus:outline-none focus:ring-blue-500 dark:border-gray-500 dark:bg-gray-600 dark:text-white dark:placeholder-gray-400"
                            pattern=".{8,}"
                            required
                            onChange={(e: any) => {
                                setData({
                                    ...data,
                                    password: e.target.value
                                });
                            }}
                        />
                        <span className="mt-1 hidden text-sm text-red-400">
                            Password must be at least 8 characters.{' '}
                        </span>
                    </div>

                    <button
                        type="submit"
                        disabled={!canSubmit}
                        className="mb-8 mt-2 w-full rounded-lg bg-green-600 px-5 py-3 text-center text-sm font-medium text-white hover:bg-green-700 focus:outline-none focus:ring-4 focus:ring-blue-300 disabled:cursor-not-allowed disabled:bg-gradient-to-br disabled:from-gray-100 disabled:to-gray-300 disabled:text-gray-400 group-invalid:pointer-events-none group-invalid:bg-gradient-to-br group-invalid:from-gray-100 group-invalid:to-gray-300 group-invalid:text-gray-400 group-invalid:opacity-70"
                    >
                        Login to your account
                    </button>

                    <div className="text-md flex items-center justify-center text-center font-medium text-gray-500 dark:text-gray-300">
                        <NextLink
                            href="/register"
                            className="flex w-20 items-center justify-between text-gray-500 hover:text-gray-800 hover:underline dark:text-gray-200 dark:hover:text-white"
                        >
                            Register <FiChevronRight className="text-lg" />
                        </NextLink>
                    </div>
                </form>
            </div>
        </div>
    );
};

export default LoginForm;
Finally, we need to create a RegisterForm.tsx file and past in the below code:
import { useAuth } from '@/context/AuthContext';
import { RegistrationType } from '@/types/AuthTypes';
import NextLink from 'next/link';
import { useRouter } from 'next/router';
import { useState } from 'react';
import { FiChevronLeft } from 'react-icons/fi';

const RegistrationForm = () => {
    const [data, setData] = useState<RegistrationType>({
        email: '',
        password: ''
    });

    // Use the signUp method from the AuthContext
    const { signUp } = useAuth();
    const router = useRouter();

    const handleRegistration = async (e: any) => {
        e.preventDefault();
        try {
            await signUp(data.email, data.password);
            router.push('/dashboard');
        } catch (error: any) {
            console.log(error.message);
        }
        console.log(data);
    };

    // Destructure data from the data object
    const { ...allData } = data;

    // Disable submit button until all fields are filled in
    const canSubmit = [...Object.values(allData)].every(Boolean);

    return (
        <div className="flex items-center justify-center">
            <div className="w-full max-w-sm rounded-lg border border-gray-200 bg-white p-4 py-8 shadow-md dark:border-gray-700 dark:bg-gray-800 sm:p-6 sm:py-10 md:p-8 md:py-14">
                <form action="" onSubmit={handleRegistration} className="group">
                    <h5 className="mb-2 text-center text-2xl font-medium text-gray-900 dark:text-white sm:text-3xl sm:font-semibold">
                        Register
                    </h5>
                    <p className="text-md mb-8 text-center">
                        Fill in the form below to create a new account
                    </p>
                    <div className="mb-5">
                        <label
                            htmlFor="email"
                            className="mb-2 block text-sm font-medium text-gray-900 dark:text-white"
                        >
                            Your email
                        </label>
                        <input
                            type="email"
                            name="email"
                            id="email"
                            className="valid:[&:not(:placeholder-shown)]:border-green-500 [&:not(:placeholder-shown):not(:focus):invalid~span]:block invalid:[&:not(:placeholder-shown):not(:focus)]:border-red-400 block w-full rounded-lg border border-gray-300 bg-gray-50 p-2.5 text-sm text-gray-900 placeholder-gray-300 focus:border-blue-500 focus:ring-blue-500 dark:border-gray-500 dark:bg-gray-600 dark:text-white dark:placeholder-gray-400"
                            autoComplete="off"
                            required
                            pattern="[a-z0-9._+-]+@[a-z0-9.-]+\.[a-z]{2,}$"
                            placeholder="name@company.com"
                            onChange={(e: any) => {
                                setData({
                                    ...data,
                                    email: e.target.value
                                });
                            }}
                        />
                        <span className="mt-1 hidden text-sm text-red-400">
                            Please enter a valid email address.{' '}
                        </span>
                    </div>
                    <div className="mb-5">
                        <label
                            htmlFor="password"
                            className="mb-2 block text-sm font-medium text-gray-900 dark:text-white"
                        >
                            Your password
                        </label>
                        <input
                            type="password"
                            name="password"
                            id="password"
                            placeholder="••••••••"
                            className="valid:[&:not(:placeholder-shown)]:border-green-500 [&:not(:placeholder-shown):not(:focus):invalid~span]:block invalid:[&:not(:placeholder-shown):not(:focus)]:border-red-400 block w-full rounded-lg border border-gray-300 bg-gray-50 p-2.5 text-sm text-gray-900 placeholder-gray-300 focus:border-blue-500 focus:ring-blue-500 dark:border-gray-500 dark:bg-gray-600 dark:text-white dark:placeholder-gray-400"
                            pattern=".{8,}"
                            required
                            onChange={(e: any) => {
                                setData({
                                    ...data,
                                    password: e.target.value
                                });
                            }}
                        />
                        <span className="mt-1 hidden text-sm text-red-400">
                            Password must be at least 8 characters.{' '}
                        </span>
                    </div>

                    <button
                        type="submit"
                        disabled={!canSubmit}
                        className="mb-8 mt-2 w-full rounded-lg bg-green-600 px-5 py-3 text-center text-sm font-medium text-white hover:bg-green-700 focus:outline-none focus:ring-4 focus:ring-blue-300 disabled:cursor-not-allowed disabled:bg-gradient-to-br disabled:from-gray-100 disabled:to-gray-300 disabled:text-gray-400 group-invalid:pointer-events-none group-invalid:bg-gradient-to-br group-invalid:from-gray-100 group-invalid:to-gray-300 group-invalid:text-gray-400 group-invalid:opacity-70"
                    >
                        Create account
                    </button>
                    <div className="text-md flex items-center justify-center text-center font-medium text-gray-500 dark:text-gray-300">
                        <NextLink
                            href="/"
                            className="flex w-32 items-center justify-between text-gray-500 hover:text-gray-800 hover:underline dark:text-gray-200 dark:hover:text-white"
                        >
                            <FiChevronLeft className="text-xl" /> Login Instead
                        </NextLink>
                    </div>
                </form>
            </div>
        </div>
    );
};

export default RegistrationForm;
The source code is available in my Github account at https://github.com/realstoman/nextjs-firebase-auth
Conclusion
I hope this tutorial helps you with implementing the Firebase authentication in the JavaScript ecosystem. If you found this helpful, give the Github repository a star and share it with your friends so they can benefit from it as well.
Thank you!